MyBatis の Mapper をサービスに DI する方法 (2) [開発]
今回も MyBatis の Mapper をサービスに DI するサンプルを作成します。
前回はセッターインジェクションを使いましたが、今回は Autowired アノテーションを使います。
Autowired アノテーションを使うことで Spring 設定ファイルを簡略化できます。
MyBatis と Spring Framework の環境構築方法は下記を参照してください。
10/1 ブログ (MyBatis のサンプルを作ってみる)
(1) データベースの準備
MySQLをインストールし、テスト用に以下のようなテーブルを準備しました。
(2) Springの設定ファイル (applicationContext.xml) を編集します。
前回からの変更分は赤字で記載しています。
(3) Mapper を作成します。(変更なし)
(4) HelloService インタフェースを作成します。(変更なし)
(5) HelloServiceImpl を作成します。
前回からの変更分は赤字で記載しています。
(6) 動作確認用コードを作成します。変更なし。
実行すると「おはよう」と表示されます。
")
前回はセッターインジェクションを使いましたが、今回は Autowired アノテーションを使います。
Autowired アノテーションを使うことで Spring 設定ファイルを簡略化できます。
MyBatis と Spring Framework の環境構築方法は下記を参照してください。
10/1 ブログ (MyBatis のサンプルを作ってみる)
(1) データベースの準備
MySQLをインストールし、テスト用に以下のようなテーブルを準備しました。

(2) Springの設定ファイル (applicationContext.xml) を編集します。
前回からの変更分は赤字で記載しています。
<?xml version="1.0" encoding="UTF-8"?>
<beans xmlns="http://www.springframework.org/schema/beans"
xmlns:xsi="http://www.w3.org/2001/XMLSchema-instance"
xmlns:context="http://www.springframework.org/schema/context"
xmlns:mybatis="http://mybatis.org/schema/mybatis-spring"
xsi:schemaLocation="
http://www.springframework.org/schema/beans
http://www.springframework.org/schema/beans/spring-beans-4.0.xsd
http://www.springframework.org/schema/context
http://www.springframework.org/schema/context/spring-context-4.0.xsd
http://mybatis.org/schema/mybatis-spring
http://mybatis.org/schema/mybatis-spring.xsd">
<!-- DataSource -->
<bean id="dataSource" class="org.apache.commons.dbcp2.BasicDataSource">
<property name="driverClassName" value="com.mysql.jdbc.Driver" />
<property name="url" value="jdbc:mysql://localhost/mybatis" />
<property name="username" value="mybatis" />
<property name="password" value="mybatis" />
</bean>
<!-- SqlSessionFactory -->
<bean id="sqlSessionFactory" class="org.mybatis.spring.SqlSessionFactoryBean" >
<property name="dataSource" ref="dataSource" />
</bean>
<!-- Mapper -->
<bean id="helloMapper" class="org.mybatis.spring.mapper.MapperFactoryBean">
<property name="mapperInterface" value="sample.HelloMapper" />
<property name="sqlSessionFactory" ref="sqlSessionFactory" />
</bean>
<mybatis:scan base-package="sample" />
<!-- サービス -->
<bean id="helloService" class="sample.HelloServiceImpl" />
<property name="helloMapper" ref="helloMapper" />
</bean>
</beans>
(3) Mapper を作成します。(変更なし)
package sample;
import org.apache.ibatis.annotations.Param;
import org.apache.ibatis.annotations.Select;
public interface HelloMapper {
@Select("select * from tbl_hello where id = #{id}")
Hello getById(@Param("id") int id);
}
(4) HelloService インタフェースを作成します。(変更なし)
package sample;
public interface HelloService {
public Hello hello(int msgId);
}
(5) HelloServiceImpl を作成します。
前回からの変更分は赤字で記載しています。
package sample;
public class HelloServiceImpl implements HelloService {
@Autowired
private HelloMapper helloMapper;
public void setHelloMapper(HelloMapper helloMapper) {
this.helloMapper = helloMapper;
}
@Override
public Hello hello(int msgId) {
Hello ret = this.helloMapper.getById(msgId);
return ret;
}
}
(6) 動作確認用コードを作成します。変更なし。
public class SampleMain {
public static void main(String[] args) {
String resource =
"src/main/webapp/WEB-INF/applicationContext.xml";
ApplicationContext ac =
new FileSystemXmlApplicationContext(resource);
HelloService helloService = (HelloService) ac.getBean("helloService");
Hello hello = helloService.hello(1);
System.out.println(hello.getMessage());
}
}
実行すると「おはよう」と表示されます。
オブジェクト指向のこころ (SOFTWARE PATTERNS SERIES)
- 作者: アラン・シャロウェイ
- 出版社/メーカー: 丸善出版
- 発売日: 2014/03/11
- メディア: 単行本(ソフトカバー)
MyBatis の Mapper をサービスに DI する方法 (1) [開発]
今回は、MyBatis の Mapper をサービスに DI するサンプルを作成します。
セッターインジェクションで DI します。
MyBatis と Spring Framework の環境構築方法は下記を参照してください。
10/1 ブログ (MyBatis のサンプルを作ってみる)
(1) データベースの準備
MySQLをインストールし、テスト用に以下のようなテーブルを準備しました。
(2) Springの設定ファイル (applicationContext.xml) を編集します。
10/1 ブログのサンプルからの追加分は赤字で記載しています。
(3) Mapper を作成します。
10/1 ブログのサンプルから変更ありません。
(4) HelloService インタフェースを作成します。新規追加。
(5) HelloServiceImpl を作成します。新規追加。
(6) 動作確認用コードを作成します。
10/1 ブログのサンプルからの変更分は赤字で記載しています。
実行すると「おはよう」と表示されます。

セッターインジェクションで DI します。
MyBatis と Spring Framework の環境構築方法は下記を参照してください。
10/1 ブログ (MyBatis のサンプルを作ってみる)
(1) データベースの準備
MySQLをインストールし、テスト用に以下のようなテーブルを準備しました。
(2) Springの設定ファイル (applicationContext.xml) を編集します。
10/1 ブログのサンプルからの追加分は赤字で記載しています。
<?xml version="1.0" encoding="UTF-8"?>
<beans xmlns="http://www.springframework.org/schema/beans"
xmlns:xsi="http://www.w3.org/2001/XMLSchema-instance"
xmlns:context="http://www.springframework.org/schema/context"
xmlns:mybatis="http://mybatis.org/schema/mybatis-spring"
xsi:schemaLocation="
http://www.springframework.org/schema/beans
http://www.springframework.org/schema/beans/spring-beans-4.0.xsd
http://www.springframework.org/schema/context
http://www.springframework.org/schema/context/spring-context-4.0.xsd
http://mybatis.org/schema/mybatis-spring
http://mybatis.org/schema/mybatis-spring.xsd">
<!-- DataSource -->
<bean id="dataSource" class="org.apache.commons.dbcp2.BasicDataSource">
<property name="driverClassName" value="com.mysql.jdbc.Driver" />
<property name="url" value="jdbc:mysql://localhost/mybatis" />
<property name="username" value="mybatis" />
<property name="password" value="mybatis" />
</bean>
<!-- SqlSessionFactory -->
<bean id="sqlSessionFactory" class="org.mybatis.spring.SqlSessionFactoryBean" >
<property name="dataSource" ref="dataSource" />
</bean>
<!-- Mapper -->
<bean id="helloMapper" class="org.mybatis.spring.mapper.MapperFactoryBean">
<property name="mapperInterface" value="sample.HelloMapper" />
<property name="sqlSessionFactory" ref="sqlSessionFactory" />
</bean>
<!-- サービス -->
<bean id="helloService" class="sample.HelloServiceImpl">
<property name="helloMapper" ref="helloMapper" />
</bean>
</beans>
(3) Mapper を作成します。
10/1 ブログのサンプルから変更ありません。
package sample;
import org.apache.ibatis.annotations.Param;
import org.apache.ibatis.annotations.Select;
public interface HelloMapper {
@Select("select * from tbl_hello where id = #{id}")
Hello getById(@Param("id") int id);
}
(4) HelloService インタフェースを作成します。新規追加。
package sample;
public interface HelloService {
public Hello hello(int msgId);
}
(5) HelloServiceImpl を作成します。新規追加。
package sample;
public class HelloServiceImpl implements HelloService {
private HelloMapper helloMapper;
public void setHelloMapper(HelloMapper helloMapper) {
this.helloMapper = helloMapper;
}
@Override
public Hello hello(int msgId) {
Hello ret = this.helloMapper.getById(msgId);
return ret;
}
}
(6) 動作確認用コードを作成します。
10/1 ブログのサンプルからの変更分は赤字で記載しています。
public class SampleMain {
public static void main(String[] args) {
String resource =
"src/main/webapp/WEB-INF/applicationContext.xml";
ApplicationContext ac =
new FileSystemXmlApplicationContext(resource);
HelloService helloService = (HelloService) ac.getBean("helloService");
Hello hello = helloService.hello(1);
System.out.println(hello.getMessage());
}
}
実行すると「おはよう」と表示されます。
増補改訂版 Java言語で学ぶデザインパターン入門 マルチスレッド編
- 作者: 結城 浩
- 出版社/メーカー: ソフトバンククリエイティブ
- 発売日: 2006/03/21
- メディア: 大型本
MyBatis のサンプルを作ってみる (複数行の情報を取得) [開発]
複数行を取得するサンプルを作ってみます。
MyBatis と Spring Framework の環境構築方法は下記を参照してください。
10/1 ブログ (MyBatis のサンプルを作ってみる)
(1) データベースの準備
MySQLをインストールし、テスト用に以下のようなテーブルを準備しました。
(2) Mapper を作成します。
(3) 動作確認用コードを作成します。
表示のため、拡張 for 文を使っています。
実行すると以下のように表示されます。
おはよう
こんにちは
こんばんは

MyBatis と Spring Framework の環境構築方法は下記を参照してください。
10/1 ブログ (MyBatis のサンプルを作ってみる)
(1) データベースの準備
MySQLをインストールし、テスト用に以下のようなテーブルを準備しました。
(2) Mapper を作成します。
package sample;
import java.util.List;
import org.apache.ibatis.annotations.Select;
@Select("select * from tbl_hello")
List<Hello> getAll();
}
(3) 動作確認用コードを作成します。
表示のため、拡張 for 文を使っています。
public class SampleMain {
public static void main(String[] args) {
String resource =
"src/main/webapp/WEB-INF/applicationContext.xml";
ApplicationContext ac =
new FileSystemXmlApplicationContext(resource);
HelloMapper helloMapper = (HelloMapper) ac.getBean("helloMapper");
ListhelloList = helloMapper.getAll();
for (Hello hello : helloList) {
System.out.println(hello.getMessage());
}
}
}
実行すると以下のように表示されます。
おはよう
こんにちは
こんばんは
- 作者: 結城 浩
- 出版社/メーカー: ソフトバンククリエイティブ
- 発売日: 2004/06/19
- メディア: 大型本
MyBatis のサンプルを作ってみる (複数のテーブルから情報を取得) [開発]
2014/10/13:
修正しました。
複数のテーブルを結合して情報を取得するサンプルを作ります。
MyBatis と Spring Framework の環境構築方法は下記を参照してください。
10/1 ブログ (MyBatis のサンプルを作ってみる)
(1) データベースの準備
テーブルは前回 (データベースの外部結合について (MySQL)) 作ったものをそのまま使います。
tbl_hello;
tbl_language;
(2) Mapper を作成します。
(3) 結果格納用クラスを新しく作成します。
(4) 動作確認用コードを作成します。
実行すると下記の通り表示されます。
No.1: おはよう(日本語)
No.2: こんにちは(日本語)
No.3: こんばんは(日本語)
No.4: good morning!(英語)
")
修正しました。
複数のテーブルを結合して情報を取得するサンプルを作ります。
MyBatis と Spring Framework の環境構築方法は下記を参照してください。
10/1 ブログ (MyBatis のサンプルを作ってみる)
(1) データベースの準備
テーブルは前回 (データベースの外部結合について (MySQL)) 作ったものをそのまま使います。
tbl_hello;
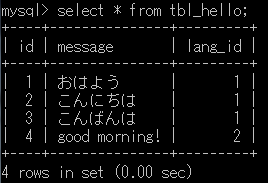
tbl_language;

(2) Mapper を作成します。
package sample;
import org.apache.ibatis.annotations.Param;
import org.apache.ibatis.annotations.Select;
public interface HelloMapper {
@Select("select tbl_hello.id, message, language from tbl_hello left join tbl_language on tbl_hello.lang_id = tbl_language.id where tbl_hello.id = #{id}")
HelloDto getById2(int id);
}
(3) 結果格納用クラスを新しく作成します。
package sample;
public class HelloDto {
int id;
String message;
String language;
public int getId() {
return id;
}
public void setId(int id) {
this.id = id;
}
public String getMessage() {
return message;
}
public void setMessage(String message) {
this.message = message;
}
public String getLanguage() {
return language;
}
public void setLanguage(String language) {
this.language = language;
}
}
(4) 動作確認用コードを作成します。
public class SampleMain {
public static void main(String[] args) {
String resource =
"src/main/webapp/WEB-INF/applicationContext.xml";
ApplicationContext ac =
new FileSystemXmlApplicationContext(resource);
HelloMapper helloMapper = (HelloMapper) ac.getBean("helloMapper");
HelloDto helloDto = new HelloDto();
for (int i = 1; i <= 4; i++) {
helloDto = helloMapper.getById2(i);
System.out.println("No." + helloDto.getId() +
": " + helloDto.getMessage() +
"(" + helloDto.getLanguage() + ")");
}
}
}
実行すると下記の通り表示されます。
No.1: おはよう(日本語)
No.2: こんにちは(日本語)
No.3: こんばんは(日本語)
No.4: good morning!(英語)
リーダブルコード ―より良いコードを書くためのシンプルで実践的なテクニック (Theory in practice)
- 作者: Dustin Boswell
- 出版社/メーカー: オライリージャパン
- 発売日: 2012/06/23
- メディア: 単行本(ソフトカバー)
データベースの外部結合について (MySQL) [開発]
外部結合についてついつい忘れてしまいがちなので、備忘録としてまとめます。
動作確認をするデータベースは MySQL です。
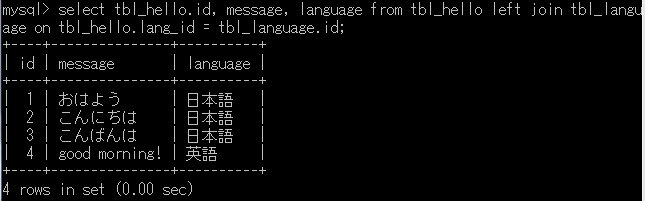
左側外部結合
join句より左側にあるテーブル1を表示し、右側にあるテーブル2の情報を結合します
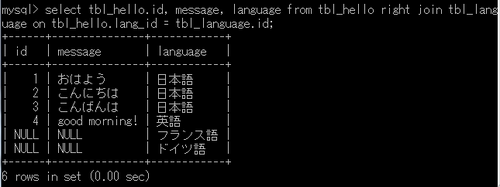
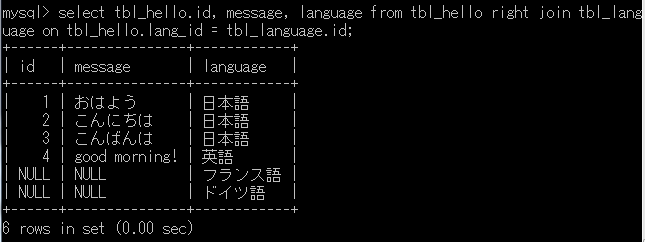
右側外部結合
join句より右側にあるテーブル2を表示し、左側にあるテーブル1の情報を結合します
サンプル
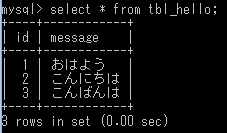
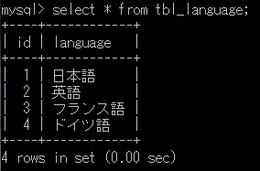
次のような2つのテーブルを用意します。
tbl_hello;
tbl_language;
まずは、左側外部結合を試します

次に、右側外部結合を試します
on句の代わりにusing句というのもあります。
これを使うためには結合条件の列名が同じである必要があります。
私自身あまり使う経験がありませんでした。
動作確認をするデータベースは MySQL です。
左側外部結合
select [テーブル名].列名, ... from テーブル1 left join テーブル2 on 結合条件;
join句より左側にあるテーブル1を表示し、右側にあるテーブル2の情報を結合します
右側外部結合
select [テーブル名].列名, ... from テーブル1 right join テーブル2 on 結合条件;
join句より右側にあるテーブル2を表示し、左側にあるテーブル1の情報を結合します
サンプル
次のような2つのテーブルを用意します。
tbl_hello;
tbl_language;
まずは、左側外部結合を試します
mysql> select tbl_hello.id, message, language from tbl_hello
left join tbl_language on tbl_hello.lang_id = tbl_language.id;
次に、右側外部結合を試します
mysql> select tbl_hello.id, message, language from tbl_hello
right join tbl_language on tbl_hello.lang_id = tbl_language.id;
on句の代わりにusing句というのもあります。
これを使うためには結合条件の列名が同じである必要があります。
私自身あまり使う経験がありませんでした。
MyBatis のサンプルを作ってみる (delete) [開発]
2014/10/13:
修正しました。
delete 文のサンプルを作ります。
MyBatis と Spring Framework の環境構築方法は下記を参照してください。
10/1 ブログ (MyBatis のサンプルを作ってみる)
(1) データベースの準備
MySQLをインストールし、テスト用に以下のようなテーブルを準備しました。
(2) Mapper を作成します。
(3) 動作確認用コードを作成します。
実行すると「retValue:1」と表示されます。
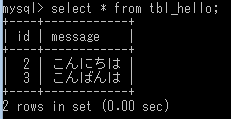
(4) 結果確認
1行目の「おはよう」が削除されました。

修正しました。
delete 文のサンプルを作ります。
MyBatis と Spring Framework の環境構築方法は下記を参照してください。
10/1 ブログ (MyBatis のサンプルを作ってみる)
(1) データベースの準備
MySQLをインストールし、テスト用に以下のようなテーブルを準備しました。
(2) Mapper を作成します。
package sample;
import org.apache.ibatis.annotations.Delete;
@Delete("delete from tbl_hello where id = #{id}")
int delete(@Param("id") int id);
}
(3) 動作確認用コードを作成します。
public class SampleMain {
public static void main(String[] args) {
String resource =
"src/main/webapp/WEB-INF/applicationContext.xml";
ApplicationContext ac =
new FileSystemXmlApplicationContext(resource);
HelloMapper helloMapper = (HelloMapper) ac.getBean("helloMapper");
int retValue = helloMapper.delete(1);
System.out.println("retValue:" + retValue);
}
}
実行すると「retValue:1」と表示されます。
(4) 結果確認
1行目の「おはよう」が削除されました。

- 作者: アンドリュー ハント
- 出版社/メーカー: ピアソンエデュケーション
- 発売日: 2000/11
- メディア: 単行本
MyBatis のサンプルを作ってみる (update) [開発]
2014/10/13:
修正しました。
update 文のサンプルを作ります。
MyBatis と Spring Framework の環境構築方法は下記を参照してください。
10/1 ブログ (MyBatis のサンプルを作ってみる)
(1) データベースの準備
MySQLをインストールし、テスト用に以下のようなテーブルを準備しました。
(2) Mapper を作成します。
(3) 動作確認用コードを作成します。
実行すると「retValue:1」と表示されます。
(4) 結果確認
1行目の「おはよう」が「Good Morning!」に変更されました。
まだ簡単なパターンしか実施していませんが、楽しくなってきました!!
")
修正しました。
update 文のサンプルを作ります。
MyBatis と Spring Framework の環境構築方法は下記を参照してください。
10/1 ブログ (MyBatis のサンプルを作ってみる)
(1) データベースの準備
MySQLをインストールし、テスト用に以下のようなテーブルを準備しました。
(2) Mapper を作成します。
package sample;
import org.apache.ibatis.annotations.Param;
import org.apache.ibatis.annotations.Update;
public interface HelloMapper {
@Update("update tbl_hello set message = #{message} where id = #{id}")
int update(@Param("id") int id, @Param("message") String message);
}
(3) 動作確認用コードを作成します。
public class SampleMain {
public static void main(String[] args) {
String resource =
"src/main/webapp/WEB-INF/applicationContext.xml";
ApplicationContext ac =
new FileSystemXmlApplicationContext(resource);
HelloMapper helloMapper = (HelloMapper) ac.getBean("helloMapper");
int retValue = helloMapper.update(1, "Good Morning!");
System.out.println("retValue:" + retValue);
}
}
実行すると「retValue:1」と表示されます。
(4) 結果確認
1行目の「おはよう」が「Good Morning!」に変更されました。

まだ簡単なパターンしか実施していませんが、楽しくなってきました!!
EFFECTIVE JAVA 第2版 (The Java Series)
- 作者: Joshua Bloch
- 出版社/メーカー: 丸善出版
- 発売日: 2014/03/11
- メディア: 単行本(ソフトカバー)
MyBatis のサンプルを作ってみる (insert) [開発]
2014/10/13:
修正しました。
insert 文のサンプルを作ります。
MyBatis と Spring Framework の環境構築方法は下記を参照してください。
10/1 ブログ (MyBatis のサンプルを作ってみる)
(1) データベースの準備
MySQLをインストールし、テスト用に以下のようなテーブルを準備しました。
(2) Mapper を作成します。
主キーとなる id は、自動生成キーになります。Options アノテーションで下記の通り設定しました。他にも設定の仕方がありそうです。今後勉強していきたいと思います。
(3) 動作確認用コードを作成します。
実行すると「retValue:1」と表示されます。
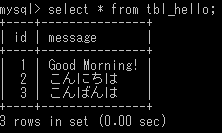
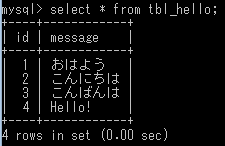
(4) 結果確認
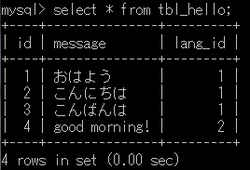
4行目に「Hello!」が追加されました。
アノテーションの設定は非常に楽ですが、細かい設定をしだすと非常に視認性が悪くなりそうです。その場合はXMLを使うのでしょうか。update、delete も引き続き勉強します。

修正しました。
insert 文のサンプルを作ります。
MyBatis と Spring Framework の環境構築方法は下記を参照してください。
10/1 ブログ (MyBatis のサンプルを作ってみる)
(1) データベースの準備
MySQLをインストールし、テスト用に以下のようなテーブルを準備しました。
(2) Mapper を作成します。
主キーとなる id は、自動生成キーになります。Options アノテーションで下記の通り設定しました。他にも設定の仕方がありそうです。今後勉強していきたいと思います。
package sample;
import org.apache.ibatis.annotations.Insert;
import org.apache.ibatis.annotations.Options;
public interface HelloMapper {
@Insert("insert into tbl_hello (message) values(#{message})")
@Options(useGeneratedKeys=true, keyProperty="id")
int insert(String message);
}
(3) 動作確認用コードを作成します。
public class SampleMain {
public static void main(String[] args) {
String resource =
"src/main/webapp/WEB-INF/applicationContext.xml";
ApplicationContext ac =
new FileSystemXmlApplicationContext(resource);
HelloMapper helloMapper = (HelloMapper) ac.getBean("helloMapper");
int retValue = helloMapper.insert("Hello!");
System.out.println("retValue:" + retValue);
}
}
実行すると「retValue:1」と表示されます。
(4) 結果確認
4行目に「Hello!」が追加されました。

アノテーションの設定は非常に楽ですが、細かい設定をしだすと非常に視認性が悪くなりそうです。その場合はXMLを使うのでしょうか。update、delete も引き続き勉強します。
Spring3入門 ――Javaフレームワーク・より良い設計とアーキテクチャ
- 作者: 長谷川 裕一
- 出版社/メーカー: 技術評論社
- 発売日: 2012/11/02
- メディア: 大型本
実行時例外 (org.springframework.beans.factory.BeanCreationException) [開発]
Exception in thread "main" org.springframework.beans.factory.BeanCreationException: Error creating bean with name 'sqlSessionFactory' defined in file [D:\workspace\MyBatis\src\main\webapp\WEB-INF\applicationContext.xml]: Error setting property values; nested exception is org.springframework.beans.PropertyBatchUpdateException; nested PropertyAccessExceptions (1) are:
PropertyAccessException 1: org.springframework.beans.MethodInvocationException: Property 'dataSource' threw exception; nested exception is java.lang.NoClassDefFoundError: org/springframework/jdbc/datasource/TransactionAwareDataSourceProxy
・・・
Caused by: org.springframework.beans.PropertyBatchUpdateException; nested PropertyAccessExceptions (1) are:
PropertyAccessException 1: org.springframework.beans.MethodInvocationException: Property 'dataSource' threw exception; nested exception is java.lang.NoClassDefFoundError: org/springframework/jdbc/datasource/TransactionAwareDataSourceProxy
・・・
MyBatis のサンプルアプリ (MyBatis のサンプルを作ってみる) を作成していたら上記のようなエラーに遭遇しました。このエラーの主な原因としては、クラスパスに spring-jdbc-xxx.jar が無かったためのようです。Maven で下記依存を追加することで解決しました。備忘録として残します。
PropertyAccessException 1: org.springframework.beans.MethodInvocationException: Property 'dataSource' threw exception; nested exception is java.lang.NoClassDefFoundError: org/springframework/jdbc/datasource/TransactionAwareDataSourceProxy
・・・
Caused by: org.springframework.beans.PropertyBatchUpdateException; nested PropertyAccessExceptions (1) are:
PropertyAccessException 1: org.springframework.beans.MethodInvocationException: Property 'dataSource' threw exception; nested exception is java.lang.NoClassDefFoundError: org/springframework/jdbc/datasource/TransactionAwareDataSourceProxy
・・・
MyBatis のサンプルアプリ (MyBatis のサンプルを作ってみる) を作成していたら上記のようなエラーに遭遇しました。このエラーの主な原因としては、クラスパスに spring-jdbc-xxx.jar が無かったためのようです。Maven で下記依存を追加することで解決しました。備忘録として残します。
groupId:org.springframework
artifactId:spring-jdbc
version:4.0.6.RELEASE
MyBatis のサンプルを作ってみる (select) [開発]
2014/10/11:
修正しました。
今回は、O/R Mapper で有名な MyBatis を学習します。Spring Framework と MyBatis と連携させたサンプルアプリを作成しました。動作するまでにかなり苦労したので備忘録として残します![[ふらふら]](https://shisuki-g.c.blog.ss-blog.jp/_images/blog/_db5/shisuki-g/__images_e_144.gif) 。
。
(1) データベースの構築
MySQLをインストールし、テスト用に以下のようなテーブルを準備しました。
(2) Maven で下記依存を追加します。
(3) Springの設定ファイル (applicationContext.xml) を編集します。
(4) Mapper を作成します。
XMLでも定義できるようですが、今回はアノテーションを使います。
(5) Entity を定義します。
(6) 動作確認用コードを作成します。
実行すると「おはよう」と表示されます。

修正しました。
今回は、O/R Mapper で有名な MyBatis を学習します。Spring Framework と MyBatis と連携させたサンプルアプリを作成しました。動作するまでにかなり苦労したので備忘録として残します
(1) データベースの構築
MySQLをインストールし、テスト用に以下のようなテーブルを準備しました。
(2) Maven で下記依存を追加します。
groupId:org.mybatis
artifactId:mybatis-spring
version:1.2.2
groupId:org.mybatis
artifactId:mybatis
version:3.2.7
groupId:org.apache.commons
artifactId:commons-dbcp2
version:2.0.1
groupId:mysql
artifactId:mysql-connector-java
version:5.1.6
groupId:org.springframework
artifactId:spring-jdbc
version:4.0.6.RELEASE
(3) Springの設定ファイル (applicationContext.xml) を編集します。
<?xml version="1.0" encoding="UTF-8"?>
<beans xmlns="http://www.springframework.org/schema/beans"
xmlns:xsi="http://www.w3.org/2001/XMLSchema-instance"
xmlns:context="http://www.springframework.org/schema/context"
xmlns:mybatis="http://mybatis.org/schema/mybatis-spring"
xsi:schemaLocation="
http://www.springframework.org/schema/beans
http://www.springframework.org/schema/beans/spring-beans-4.0.xsd
http://www.springframework.org/schema/context
http://www.springframework.org/schema/context/spring-context-4.0.xsd
http://mybatis.org/schema/mybatis-spring
http://mybatis.org/schema/mybatis-spring.xsd">
<!-- DataSource -->
<bean id="dataSource" class="org.apache.commons.dbcp2.BasicDataSource">
<property name="driverClassName" value="com.mysql.jdbc.Driver" />
<property name="url" value="jdbc:mysql://localhost/mybatis" />
<property name="username" value="mybatis" />
<property name="password" value="mybatis" />
</bean>
<!-- SqlSessionFactory -->
<bean id="sqlSessionFactory" class="org.mybatis.spring.SqlSessionFactoryBean" >
<property name="dataSource" ref="dataSource" />
</bean>
<!-- Mapper -->
<bean id="helloMapper" class="org.mybatis.spring.mapper.MapperFactoryBean">
<property name="mapperInterface" value="sample.HelloMapper" />
<property name="sqlSessionFactory" ref="sqlSessionFactory" />
</bean>
</beans>
(4) Mapper を作成します。
XMLでも定義できるようですが、今回はアノテーションを使います。
package sample;@Paramアノテーションについて : パラメータ (#{id}など) が単一の場合は、@Paramアノテーションを付けても付けなくても良いようです。もしパラメータが複数ある場合、@Paramアノテーションを引数の前につける必要があるようです。
import org.apache.ibatis.annotations.Param;
import org.apache.ibatis.annotations.Select;
public interface HelloMapper {
@Select("select * from tbl_hello where id = #{id}")
Hello getById(@Param("id") int id); }
(5) Entity を定義します。
package sample;
public class Hello {
int id;
String message;
public int getId() {
return id;
}
public void setId(int id) {
this.id = id;
}
public String getMessage() {
return message;
}
public void setMessage(String message) {
this.message = message;
}
}
(6) 動作確認用コードを作成します。
public class SampleMain {
public static void main(String[] args) {
String resource =
"src/main/webapp/WEB-INF/applicationContext.xml";
ApplicationContext ac =
new FileSystemXmlApplicationContext(resource);
HelloMapper helloMapper = (HelloMapper) ac.getBean("helloMapper");
Hello hello = helloMapper.getById(1);
System.out.println(hello.getMessage());
}
}
実行すると「おはよう」と表示されます。
SpringによるWebアプリケーションスーパーサンプル 第2版
- 作者: 株式会社クロノス
- 出版社/メーカー: ソフトバンククリエイティブ
- 発売日: 2010/11/12
- メディア: 大型本


